If you’ve ever wondered about how to set up the AdSpyglass account – this is the most comprehensive article about the configuration of AdSpyglass for your website.
Look and learn – this is simple!

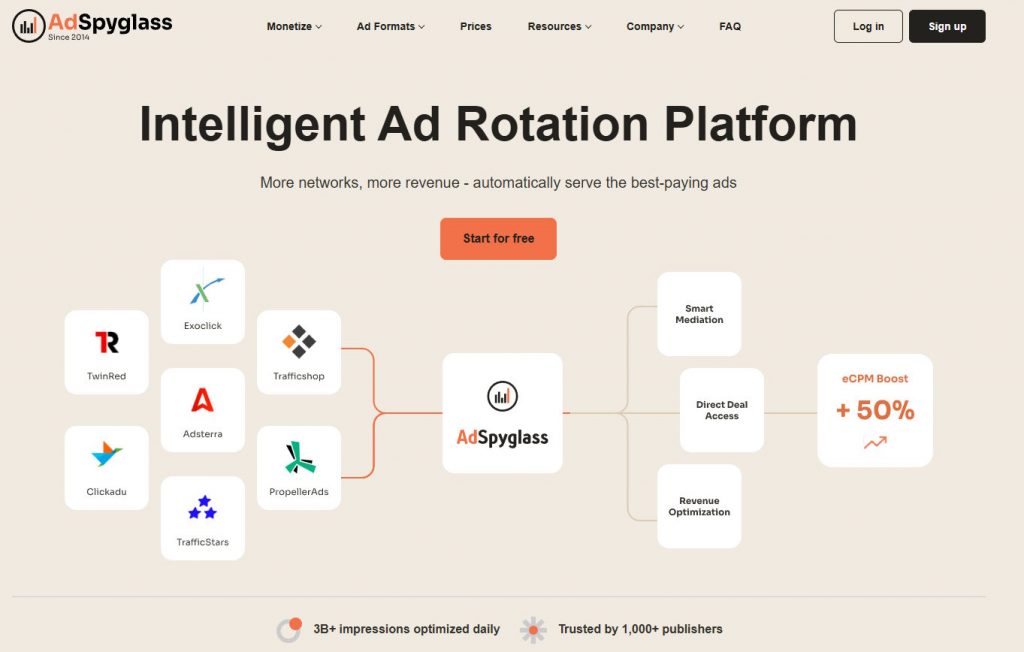
AdSpyglass itself is a large and complex technical platform with an extensive set of features and functions. But we work hard to ensure that your user-side experience will be smooth and straightforward.
Here’s the full guide that will make your first journey to AdSpyglass easy. We’ll talk about the best practices of setting up your account and explore all the terms and definitions you can meet during configuration.
Let’s go! ✊
1. Your first exposure to AdSpyglass: Get to know Websites, Streams, Spots, and initial verification.
If you’re in a hurry, we recommend to watch the video about this step to make things clearer:
Websites at AdSpyglass
When you log in to your AdSpyglass account for the first time, you’ll see only one enabled section – Websites. That’s where it all started.

We’ve disabled all other sections until you’ll add your website to help you make your first move right. So, let’s continue your configuration by pressing the “Add Website” button.

Hooray! The first button has been just pressed! We’re very proud of you.
Streams: Mainstream and Adults
The next thing you’ll see is a page for adding your website and spot. The first dropdown is needed for choosing your Stream.

Please Note: It’s strictly prohibited to pick up Mainstream if your traffic is mostly related to adult traffic. Although our experts are extremely friendly and kind, they will immediately ban your account if you choose the wrong Stream. (Don’t turn our kitties into mountain lions ?)
As soon as you’re confident about your type of stream, just pick up the option that suits you the best, and you’re good. We’ll choose the Adult-All for instance.

Website Domains
In the domains section, just type the full domain of your website. Next time you’re welcome to add a few sites (one domain per line), but now let’s get it rolling with only one. Make sure that you’ve written your URL correct, later on, you’ll need to verify the ownership of the website.

And, as a final note, you need to choose the spots you’d like to use.
Ad Spots

Besides, spots are determined not only by size and position but by ad format as well.
They are needed to let you sleep calmly and definitely know which ad formats are rotated at your website.

Verification of the website
Afterward, you’ll be redirected to your “Website” section of the site, where you’ll notice a record associated with the domain and configuration we’ve just added.
If you’re ready to continue, click “Verify”.


After clicking the “Verify” button, you’ll find yourself on the verification page. We’re suggesting three different methods of legitimacy check. Feel free to check the most convenient (or easy) one and perform all actions described in the chosen method.
As soon as you finish, don’t hesitate to press “Verify” again.
Once your website is verified, you’ll witness real magic ? – all website sections will be available for you!

You’re done, you’re great, and let’s move to the next phase.
2. Creatives Importing and Ad Network Linking.
The next step for every user of the AdSpyglass mediation system should be the linking of Ad Networks.
If you’re short on time, we also have a video for you to watch:
Creatives guide. What is “Creatives” and how to import them correctly.
Here’s another significant step on your way to getting more profit from your website. This chapter will tell you about creatives: what it is, why do you need them, and how to use the entity in the AdSpyglass Ad Mediation system.

To start configuring your Creatives, you should go to the “Ad Mediation” section to manage your creatives.
Then, press “Add Creative” near the spot you want to fill in.
After that, you need to choose the campaign for your creative. For doing it, just expand the “Campaign Name” dropdown and choose the one you need. Then, you should specify the name of your creative.
Linking Ad Network Account

It is needed to establish the connection between Networks and AdSpyglass to let our system receive, analyze, and show your ads.
Note: Feel free to add as many network accounts as you want. Since AdSpyglass can rotate ads from different networks at the same time, there are no limits by the amount of linked Ad Networks. So, it is right for you to have several of them in terms of maximizing your profit.
Let us demonstrate to you an example of linking the Exoclick account.
First, we need to navigate to the “Ad Network” dropdown and find the required network’s label. Afterward, you’ll see a modal window for Ad Network linking. The next step is inserting the Login and API token (or password) of your account. Then, just press “Save”.
As soon as the process is completed, you’ll be redirected to the previous page for completing the creative configuration.

We’ve just shown you a full process of linking one AdNetwork. We’ve already done the same thing with another one – TwinRed.
So, let’s move forward, keeping in mind that we already have two network accounts linked.
And as we said, it’s in your interest to connect as many networks as possible.
After that, choose the Ad Network associated with your creative and press “Import from Ad Network”.
Auto-importing of your Creatives
Just as we did with Exoclick creative on the screenshot. This is what we call auto-import.

Manual creative import
However, some of the networks still don’t support automated import, and we need to do it manually.
To add creative manually, you need to hit “Add Creative” near the spot you’d like to configure.
After that, you need to find out 2 essential parameters: Zone ID and Link URL. In most cases, all requests regarding obtaining links can be easily handled by your Ad Network manager. Don’t hesitate to reach out to the manager from your Ad Network to get IDs and URLs.
Look how the process looks like with the TwinRed creatives.

As soon as you have everything you need, you can insert the data into the appropriate field and hit “Save” at the bottom of the page.
Bonus: Mass import of your creatives
There is another way to import all your creatives at once.
Please note: This feature is applicable only to creatives of Ad networks that support auto-import. For example Adnium, Adsterra, Clickaine, ExoClick, Hilltops, JuicyAds, PropellerAds, TrafficShop, Tubecorporate.
To proceed with automated mass import you need to press the blue ” Import creatives from Ad Networks” button and wait until creatives will be added.
Here’s how to do it:

Boom! Another step is completed, let’s move forward.
3. Adding the AdSpyglass codes to your website
Before your account is completely configured, you need to perform the last action – Place the AdSpyglass codes at your website.

Placing codes is a really simple step, however if you’d like to save your time we recommend watching the video:
Navigate to the “Get Codes” interface of the AdSpyglass account. There, you’ll find the previously added website. Hit the “Get Codes” button near the appropriate spot to open the panel.
As we’ve chosen the Popunder format for exemplary setup, let’s pick up the auto-generated Popunder code.
Then, we need to copy and paste the given code as the first item into the <body> of every webpage you want to trigger a popunder.

Note: Make sure that you have removed old popunder codes from your website! Codes from ad networks will conflict with AdSpyglass code if you add them both.
That’s all. Now your account is fully prepared for managing ads from several Ad Networks. Welcome to the AdSpyglass squat, rookie!
4. Analysis and Enjoying the significant growth of your profit.
After completing all procedures described in the previous chapter, go to “Dashboard”.

You should see real-time activities and updates in “Current Activity”.
In the future, feel free to use the chart for quick checking of your progress. Also, there is the “Income History” chart that shows your income.
Please note: Due to Ad Networks limitations, displayed current income and income for the previous days may be shown with delay.
In case when you need in-depth analysis and statistics, you may use “Reports.” There are many different parameters and functions that can help you build your reports in the most flexible and accurate manner.
Keep in mind: The information about your income in “Reports” for the current day will be available at 8 am UTC of the next calendar day. (It’s not us – Ad Network’s delays)
Feel free to use both of these tools to track how rapidly your income is growing with AdSpyglass.
Thank you for reading the article. We hope it helped you to understand the configuration process better. We’ve tried to cover the most frequent questions, but if you still have some, feel free to reach out to our experts. They’ll love to help you! ?